Comment mettre un background à un TextField

Bonjour à tous, aujourd’hui je vous fais découvrir une petite astuce, toute simple pour pouvoir mettre un background à un TextField. Ce petit trick ne casse pas des briques mais ça fais un bon petit aide mémoire. Il faut préférer l’utilisation d’un « TextField » plutôt qu’un « TextInput« , grâce à cela vous pourrez utiliser « TextFieldStyle » qui permet de personnalisé le TextField. JavaScript import QtQuick 2.0 import Ubuntu.Components 1.1 import QtQuick.Controls 1.1 import QtQuick.Controls.Styles 1.1 MainView { id: main width: 400 height: 300 Column { spacing: units.gu(2) anchors.centerIn: parent TextInput { text: "TextInput par defaut" cursorVisible: false width: main.width - units.gu(25) } TextField { placeholderText: "TextField par defaut" width: main.width - units.gu(25) } TextField { placeholderText: "TextField avec background" width: main.width - units.gu(25) text: "TextField avec background" style: TextFieldStyle { textColor: "black" background: Rectangle { radius: 5 color: "orange" implicitWidth: 100 implicitHeight: 24 border.color: "#333" border.width: 1 } } } } } 12345678910111213141516171819202122232425262728293031323334353637383940 import QtQuick 2.0import Ubuntu.Components 1.1import QtQuick.Controls 1.1import QtQuick.Controls.Styles 1.1 MainView { id: main width: 400 height: 300 Column { spacing: units.gu(2) anchors.centerIn: parent TextInput { text: "TextInput par defaut" cursorVisible: false width: main.width - units.gu(25) } TextField { placeholderText: "TextField par defaut" width: main.width - units.gu(25) } TextField { placeholderText: "TextField avec background" width: main.width - units.gu(25) text: "TextField avec background" style: TextFieldStyle { textColor: "black" background: Rectangle { radius: 5 color: "orange" implicitWidth: 100 implicitHeight: 24 border.color: "#333" border.width: 1 } } } }} Et voici le rendu : ...
Read MoreComment utiliser le système de notification avec qml et unity
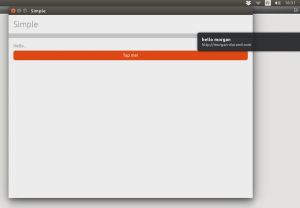
Comment utiliser le système de notification d’ubuntu (et d’autres distribution) depuis QML ? Autant que je le sache, il n’existe pas d’API QML pour accéder au système de notification. Pour éviter d’avoir à créer un plugin C++ pour avoir les notifications sur une application desktop, il est plus simple d’utiliser pyotherside et d’appeler un petit module python pour effectuer le travail. Pré-requis : Vous l’aurez compris, il suffit de s’assurer que pyotherside est installé. D’abbord, assuré vous d’avoir les bon ppa Shell sudo add-apt-repository ppa:ubuntu-sdk-team/ppa sudo add-apt-repository ppa:checkbox-dev/ppa sudo apt-get update 123 sudo add-apt-repository ppa:ubuntu-sdk-team/ppasudo add-apt-repository ppa:checkbox-dev/ppasudo apt-get update puis lancer l’installation Shell sudo ap-get install pyotherside 1 sudo ap-get install pyotherside Au boulot : Et voici la petite application QML : JavaScript import QtQuick 2.0 import Ubuntu.Components 1.1 import io.thp.pyotherside 1.2 /*! \brief MainView with a Label and Button elements. */ MainView { // objectName for functional testing purposes (autopilot-qt5) objectName: "mainView" // Note! applicationName needs to match the "name" field of the click manifest applicationName: "com.ubuntu.developer.username.notification" /* This property enables the application to change orientation when the device is rotated. The default is false. */ //automaticOrientation: true // Removes the old toolbar and enables new features of the new header. useDeprecatedToolbar: false width: units.gu(100) height: units.gu(75) Page { title: i18n.tr("Simple") Column { spacing: units.gu(1) anchors { margins: units.gu(2) fill: parent } Label { id: label objectName: "label" text: i18n.tr("Hello..") } Button { objectName: "button" width: parent.width text: i18n.tr("Tap me!") onClicked: { //label.text = i18n.tr("..world!") py.call('notify.pressme', [], function() {}); } } Python { id: py Component.onCompleted: { addImportPath(Qt.resolvedUrl('.')); importModule('notify', function() {}); } } } } } 12345678910111213141516171819202122232425262728293031323334353637383940414243444546474849505152535455565758596061626364 import QtQuick 2.0import Ubuntu.Components 1.1import io.thp.pyotherside 1.2/*! \brief MainView with a Label and Button elements.*/ MainView { // objectName for functional testing purposes (autopilot-qt5) objectName: "mainView" // Note! applicationName needs to match the "name" field of the click manifest applicationName: "com.ubuntu.developer.username.notification" /* This property enables the application to change orientation when the device is rotated. The default is false. */ //automaticOrientation: true // Removes the old toolbar and enables new features of the new header. useDeprecatedToolbar: false width: units.gu(100) height: units.gu(75) Page { title: i18n.tr("Simple") Column { spacing: units.gu(1) anchors { margins: units.gu(2) fill: parent } Label { id: label objectName: "label" text: i18n.tr("Hello..") } Button { objectName: "button" width: parent.width text: i18n.tr("Tap me!") onClicked: { //label.text = i18n.tr("..world!") py.call('notify.pressme', [], function() {}); } } Python { id: py Component.onCompleted: { addImportPath(Qt.resolvedUrl('.')); importModule('notify', function() {}); } } } }} ensuite créer un fichier nommé notify.py dans le même répertoire que le fichier qml Python #!/usr/bin/env python3 import subprocess def pressme(): subprocess.call(["notify-send", "hello morgan", "http://morgan-durand.com"]) 123456 #!/usr/bin/env python3 import subprocess def pressme(): subprocess.call(["notify-send", "hello morgan", "http://morgan-durand.com"]) Et voila le...
Read More