Ubuntu touch – Comment parser une API JSON dans un ListView
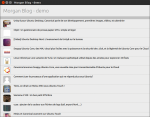
Bonjour à tous, Dans ce petit tutoriel rapide on va voir comment récupérer les données d’une API JSON et de les afficher dans un ListView. Voici un petit exemple du résultat final : Qt fournis déjà une petite feature l XMLListModel qui permet de paser aisément du XML. Malheureusement aucun component ne permet de le faire en JSON. Un peut partout sur le net on trouve des petites bidouilles pour le faire via du javascript. L’utilisation du javascript pure est simple et efficace. Le seul bémol c’est lorsqu’on commence à avoir une API un petit peut compliqué, le code deviens très vite désorganisé. Heureusement, la nature ayant horreur du vide. Un grand merci à Romain Pokrzywka qui nous à préparer un petit component pour parser du JSON : JSONListModel. C’est beaucoup plus propre que d’utiliser du javascript pure. Il suffit de télécharger les fichier JSONListModel.qml et jsonpath.js. Insérer les dans votre projet et le tour est joué. Voici une petite démo d’utilisation: JavaScript import QtQuick 2.0 import Ubuntu.Components 1.1 import Ubuntu.Components.ListItems 1.0 as ListItem /*! \brief MainView with a Label and Button elements. */ MainView { // objectName for functional testing purposes (autopilot-qt5) objectName: "mainView" // Note! applicationName needs to match the "name" field of the click manifest applicationName: "com.ubuntu.developer.username.newapp" /* This property enables the application to change orientation when the device is rotated. The default is false. */ //automaticOrientation: true // Removes the old toolbar and enables new features of the new header. useDeprecatedToolbar: false width: units.gu(100) height: units.gu(75) Page { title: i18n.tr("Morgan Blog - demo") ListView { id: redditList anchors.fill: parent JSONListModel { id: redditFeed source: "http://www.reddit.com/r/Ubuntufr/hot.json" query: "$.data.children[*]" } model: redditFeed.model delegate: ListItem.Subtitled { Component.onCompleted: console.log(model.data.title+"\n"); iconSource: model.data.thumbnail Text { width: parent.width horizontalAlignment: Text.AlignLeft font.pixelSize: 12 color: "black" text: model.data.title } } } } } 1234567891011121314151617181920212223242526272829303132333435363738394041424344454647484950515253 import QtQuick 2.0import Ubuntu.Components 1.1import Ubuntu.Components.ListItems 1.0 as ListItem/*! \brief MainView with a Label and Button elements.*/ MainView { // objectName for functional testing purposes (autopilot-qt5) objectName: "mainView" // Note! applicationName needs to match the "name" field of the click manifest applicationName: "com.ubuntu.developer.username.newapp" /* This property enables the application to change orientation when the device is rotated. The default is false. */ //automaticOrientation: true // Removes the old toolbar and enables new features of the new header. useDeprecatedToolbar: false width: units.gu(100) height: units.gu(75) Page { title: i18n.tr("Morgan Blog - demo") ListView { id: redditList anchors.fill: parent JSONListModel { id: redditFeed source: "http://www.reddit.com/r/Ubuntufr/hot.json" query: "$.data.children[*]" } model: redditFeed.model delegate: ListItem.Subtitled { Component.onCompleted: console.log(model.data.title+"\n"); iconSource: model.data.thumbnail Text { width: parent.width horizontalAlignment: Text.AlignLeft font.pixelSize: 12 color: "black" text: model.data.title } } } }} ...
Read MoreComment mettre un background à un TextField

Bonjour à tous, aujourd’hui je vous fais découvrir une petite astuce, toute simple pour pouvoir mettre un background à un TextField. Ce petit trick ne casse pas des briques mais ça fais un bon petit aide mémoire. Il faut préférer l’utilisation d’un « TextField » plutôt qu’un « TextInput« , grâce à cela vous pourrez utiliser « TextFieldStyle » qui permet de personnalisé le TextField. JavaScript import QtQuick 2.0 import Ubuntu.Components 1.1 import QtQuick.Controls 1.1 import QtQuick.Controls.Styles 1.1 MainView { id: main width: 400 height: 300 Column { spacing: units.gu(2) anchors.centerIn: parent TextInput { text: "TextInput par defaut" cursorVisible: false width: main.width - units.gu(25) } TextField { placeholderText: "TextField par defaut" width: main.width - units.gu(25) } TextField { placeholderText: "TextField avec background" width: main.width - units.gu(25) text: "TextField avec background" style: TextFieldStyle { textColor: "black" background: Rectangle { radius: 5 color: "orange" implicitWidth: 100 implicitHeight: 24 border.color: "#333" border.width: 1 } } } } } 12345678910111213141516171819202122232425262728293031323334353637383940 import QtQuick 2.0import Ubuntu.Components 1.1import QtQuick.Controls 1.1import QtQuick.Controls.Styles 1.1 MainView { id: main width: 400 height: 300 Column { spacing: units.gu(2) anchors.centerIn: parent TextInput { text: "TextInput par defaut" cursorVisible: false width: main.width - units.gu(25) } TextField { placeholderText: "TextField par defaut" width: main.width - units.gu(25) } TextField { placeholderText: "TextField avec background" width: main.width - units.gu(25) text: "TextField avec background" style: TextFieldStyle { textColor: "black" background: Rectangle { radius: 5 color: "orange" implicitWidth: 100 implicitHeight: 24 border.color: "#333" border.width: 1 } } } }} Et voici le rendu : ...
Read MoreComment utiliser le système de notification avec qml et unity
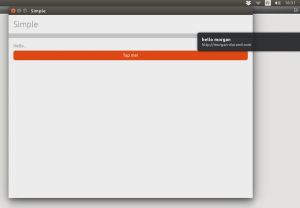
Comment utiliser le système de notification d’ubuntu (et d’autres distribution) depuis QML ? Autant que je le sache, il n’existe pas d’API QML pour accéder au système de notification. Pour éviter d’avoir à créer un plugin C++ pour avoir les notifications sur une application desktop, il est plus simple d’utiliser pyotherside et d’appeler un petit module python pour effectuer le travail. Pré-requis : Vous l’aurez compris, il suffit de s’assurer que pyotherside est installé. D’abbord, assuré vous d’avoir les bon ppa Shell sudo add-apt-repository ppa:ubuntu-sdk-team/ppa sudo add-apt-repository ppa:checkbox-dev/ppa sudo apt-get update 123 sudo add-apt-repository ppa:ubuntu-sdk-team/ppasudo add-apt-repository ppa:checkbox-dev/ppasudo apt-get update puis lancer l’installation Shell sudo ap-get install pyotherside 1 sudo ap-get install pyotherside Au boulot : Et voici la petite application QML : JavaScript import QtQuick 2.0 import Ubuntu.Components 1.1 import io.thp.pyotherside 1.2 /*! \brief MainView with a Label and Button elements. */ MainView { // objectName for functional testing purposes (autopilot-qt5) objectName: "mainView" // Note! applicationName needs to match the "name" field of the click manifest applicationName: "com.ubuntu.developer.username.notification" /* This property enables the application to change orientation when the device is rotated. The default is false. */ //automaticOrientation: true // Removes the old toolbar and enables new features of the new header. useDeprecatedToolbar: false width: units.gu(100) height: units.gu(75) Page { title: i18n.tr("Simple") Column { spacing: units.gu(1) anchors { margins: units.gu(2) fill: parent } Label { id: label objectName: "label" text: i18n.tr("Hello..") } Button { objectName: "button" width: parent.width text: i18n.tr("Tap me!") onClicked: { //label.text = i18n.tr("..world!") py.call('notify.pressme', [], function() {}); } } Python { id: py Component.onCompleted: { addImportPath(Qt.resolvedUrl('.')); importModule('notify', function() {}); } } } } } 12345678910111213141516171819202122232425262728293031323334353637383940414243444546474849505152535455565758596061626364 import QtQuick 2.0import Ubuntu.Components 1.1import io.thp.pyotherside 1.2/*! \brief MainView with a Label and Button elements.*/ MainView { // objectName for functional testing purposes (autopilot-qt5) objectName: "mainView" // Note! applicationName needs to match the "name" field of the click manifest applicationName: "com.ubuntu.developer.username.notification" /* This property enables the application to change orientation when the device is rotated. The default is false. */ //automaticOrientation: true // Removes the old toolbar and enables new features of the new header. useDeprecatedToolbar: false width: units.gu(100) height: units.gu(75) Page { title: i18n.tr("Simple") Column { spacing: units.gu(1) anchors { margins: units.gu(2) fill: parent } Label { id: label objectName: "label" text: i18n.tr("Hello..") } Button { objectName: "button" width: parent.width text: i18n.tr("Tap me!") onClicked: { //label.text = i18n.tr("..world!") py.call('notify.pressme', [], function() {}); } } Python { id: py Component.onCompleted: { addImportPath(Qt.resolvedUrl('.')); importModule('notify', function() {}); } } } }} ensuite créer un fichier nommé notify.py dans le même répertoire que le fichier qml Python #!/usr/bin/env python3 import subprocess def pressme(): subprocess.call(["notify-send", "hello morgan", "http://morgan-durand.com"]) 123456 #!/usr/bin/env python3 import subprocess def pressme(): subprocess.call(["notify-send", "hello morgan", "http://morgan-durand.com"]) Et voila le...
Read More